
SAR User Guide for Solavixa Audio Recorder
This SAR user guide helps you get started with Solavixa Audio Recorder 3.0, choose the right recording source, configure Application and Multi-App Capture, add a microphone, use Instant Replay, set up automatic recording modes, manage output and recovery, and understand licensing.
Main Window · Recorder · Sources · Multi-App & Microphone · Instant Replay · Output · Settings · Recovery · Licensing
Getting Started with SAR 3.0
SAR 3.0 can work as a simple system audio recorder or as an advanced synchronized multi-source recorder. Before recording, choose what you want SAR to capture: the complete Windows output, one selected application, multiple applications, or an Application/Multi-App session with a microphone.
The redesigned Recorder separates live recording, source selection, output, history, and settings into dedicated sections so advanced features remain accessible without crowding the main recording view.
Main Window Overview
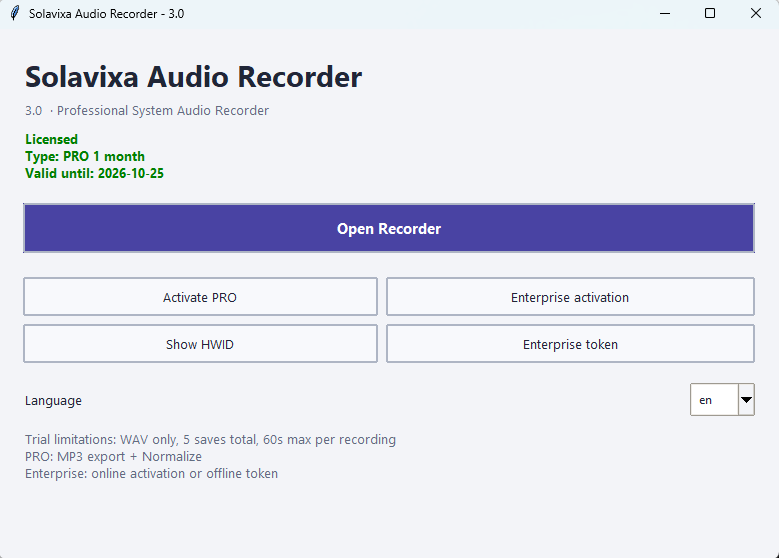
The SAR 3.0 main window provides access to licensing, language selection, device identification, and the redesigned Recorder. It is the starting point for activating SAR and opening the recording workspace.
License Status
The License Status area shows the current SAR license state and available activation options.
Depending on your license, the application can operate in Trial, PRO, or Enterprise mode.
Time-limited PRO licenses include the additional 14-day grace period after the paid license term expires.
License Activation
Use the activation controls to activate a purchased SAR license on the current computer.
SAR supports the standard online activation workflow and dedicated Enterprise activation options.
Enterprise users can also use the offline token activation workflow when required.
Hardware ID
The Hardware ID (HWID) identifies the computer used for license activation.
You may need this value when working with Solavixa licensing support, Enterprise activation, or a device-reset request.
Interface Language
Use the language selector to choose the SAR interface language.
SAR 3.0 supports seven languages:
English · Czech · German · French · Italian · Spanish · Simplified Chinese
After changing the language, restart SAR if necessary so the selected language is applied consistently throughout the interface.
Open Recorder
Click Open Recorder to enter the main SAR 3.0 recording workspace.
The Recorder contains five main sections:
Recorder · Sources · Output · History · Settings
These sections share the same active recording session, so switching between them does not interrupt or restart the recording engine.
Tip: Activate the required license and select the interface language before opening the Recorder for the first time.
Recorder Workspace Overview
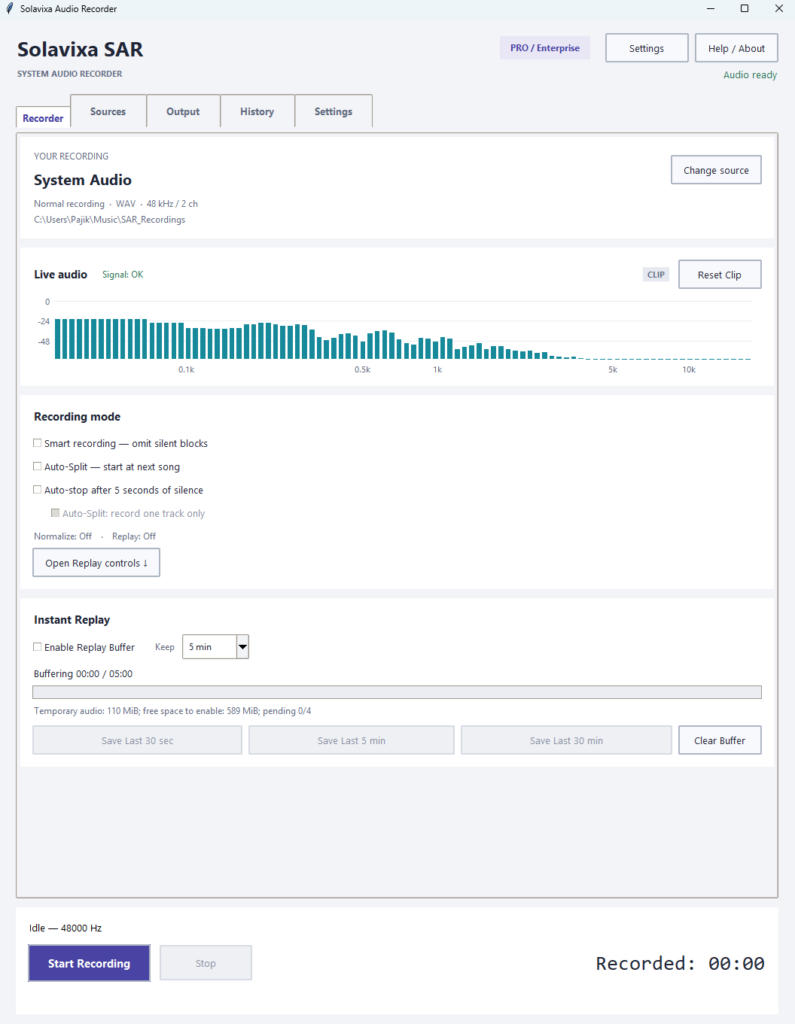
The Recorder is the main SAR 3.0 workspace. It provides recording controls, live status information, access to source configuration, Instant Replay, output settings, recording history, and audio-processing options.
All Recorder pages belong to the same active session. Moving between Recorder, Sources, Output, History, and Settings does not restart the recording engine or interrupt an active recording.
Application access
Click Open Recorder to open the dedicated recorder window. This is where actual monitoring, recording, saving, and audio processing happen. If the app is in a blocked trial/licensing state, opening the recorder may be limited.
Recording Status
The Recorder displays the current engine and recording state so you can immediately see whether SAR is Idle, recording, waiting for audio, exporting, or using Instant Replay.
Status and source messages also warn you when a selected application or device is unavailable.
Start and Stop
START begins a normal recording using the currently configured source and recording mode.
STOP ends the active recording and starts the configured save or export workflow.
The available controls automatically reflect the current Recorder state so incompatible actions cannot be started at the same time.
Open Replay Controls
Open Replay controls is a navigation shortcut.
It moves directly to the Instant Replay controls inside the Recorder. It does not start Replay, change the capture engine, or begin recording by itself.
This distinction is useful because users could otherwise assume that the button activates Instant Replay.
One Session Across All Recorder Pages
The Recorder, Sources, Output, History, and Settings pages share one active recording session. You can therefore adjust or inspect supported settings without opening a second Recorder or creating another capture engine.
Tip: Configure your recording source on the Sources page before pressing START. For a simple full-system recording, select System Audio. For individual applications, use Application Capture or Multi-App.
Choosing a Recording Source
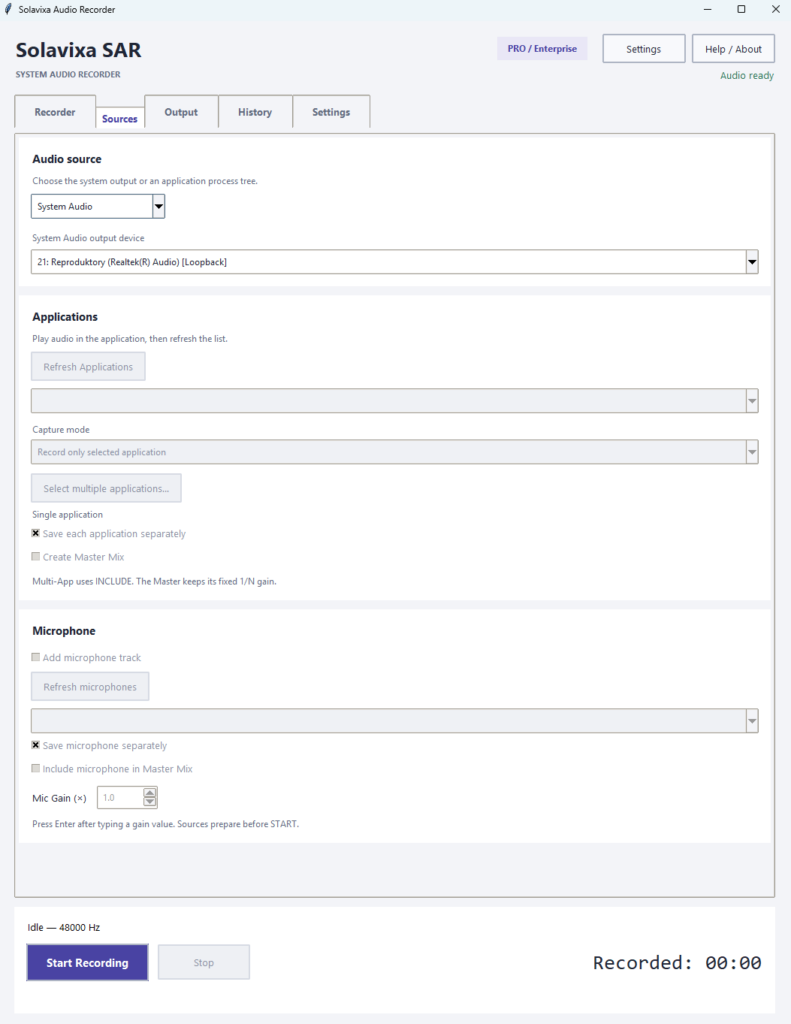
Before starting a recording, choose the capture mode that matches what you actually want to hear in the final file. SAR 3.0 supports full System Audio, single-application INCLUDE, single-application EXCLUDE, and synchronized Multi-App recording.
For Application and Multi-App Capture, SAR uses native Windows process-loopback technology where supported, so virtual audio cables are not required for normal supported workflows.
System Audio
Use System Audio when you want to record the complete output of the selected Windows playback device.
This mode captures everything that is currently being played through that device, such as browser audio, media players, notifications, and other audible applications.
Best for: simple full-system recording.
Application Capture — INCLUDE
Use INCLUDE when you want to record only one selected application.
SAR isolates the selected application process tree and excludes other system audio from the recording.
For example, you can record only Firefox while other applications continue playing normally.
Best for: isolated recording of one supported application.
Application Capture — EXCLUDE
Use EXCLUDE when you want to record supported application audio except for one selected application.
The selected application is removed from the capture while the remaining supported application audio continues to be recorded.
Best for: removing one unwanted application from an otherwise broader application recording workflow.
Multi-App Capture
Use Multi-App when you want to record several selected applications in one synchronized session.
SAR 3.0 supports up to 8 selected applications.
Each application can be saved as a separate synchronized track, and an optional Master Mix can be created from the selected sources.
Best for: editing multiple applications separately while keeping them aligned to one shared timeline.
System Audio and Application Capture Are Different Workflows
Do not combine System Audio with the same application as a separate Application Capture source. System Audio already contains that application’s audible output, which could duplicate the source in the final mix.
If you need several specific applications together, use Multi-App Capture instead.
If an application does not appear in the Application Capture list, start audio playback in that application and click Refresh Applications. Some packaged or multi-process Windows applications may not expose a reliably usable single process identity. In that case, use System Audio or another supported desktop application.
Multi-App Recording, Microphone & Master Mix
SAR 3.0 can record several applications as synchronized tracks, add a microphone as an independent source, and optionally create a Master Mix from the selected sources.
This workflow is useful when you want both individual editable tracks and a combined ready-to-use recording from the same session.
Select Multiple Applications
Enable Multi-App Capture when you want to record several supported applications at the same time.
SAR 3.0 supports up to 8 selected applications in one session.
Each selected application is captured on the same shared timeline.
Best for: browser + media player, multiple communication apps, software testing, tutorials, or workflows where each source must remain separately editable.
Save Each Application Separately
Enable separate application tracks when you want every selected application saved independently.
Each track remains synchronized with the others, so the files can later be imported into an editor without manually aligning them.
If one selected application is silent, its track remains aligned with the active sources.
Add a Microphone
A microphone can be added to Application and Multi-App recording sessions as an independent synchronized source.
Select the required microphone and enable microphone capture before starting the recording.
The microphone can be:
- saved as its own separate track,
- included in the Master Mix,
- or used in both ways at the same time.
Adjust Mic Gain
Mic Gain controls the microphone level independently from application audio.
Increase Mic Gain when the microphone signal is too quiet, but avoid excessive values that could cause clipping or distortion.
Changes made with the slider or arrow controls apply immediately.
If you enter a Mic Gain value manually, confirm it with Enter or leave the field so SAR can apply the new value.
Create a Master Mix
Master Mix combines the selected synchronized sources into one additional output file.
SAR uses fixed equal source weighting:
Master Mix = sum of active configured sources / number of configured sources
For example:
2 applications + 1 microphone = each source contributes 1/3 of the Master Mix
This fixed weighting remains stable even if one source becomes silent or unavailable, preventing the remaining sources from suddenly becoming louder.
What Happens If One Source Fails?
SAR does not automatically replace a failed application or microphone with another source.
The healthy sources continue recording, while the unavailable source is represented by silence from the point of failure so the shared timeline remains synchronized.
Reconnect the original device or application and click Refresh.
Tip: If you want only one ready-to-use combined file, enable Master Mix. If you plan to edit individual sources later, also enable separate application and microphone tracks.
Instant Replay — Save What Already Happened
Instant Replay lets SAR continuously keep recent audio available in the background, so you can save something that already happened — even if you did not start a normal recording in advance.
Replay uses a rolling disk-backed buffer and can work independently from normal recording.
Enable Replay Buffer
Enable Replay Buffer to start keeping recent audio available in the background.
Replay can remain active while SAR is otherwise Idle, allowing you to decide afterwards whether the recent audio should be saved.
Enabling Replay does not automatically start a normal recording.
Choose How Much History to Keep
SAR 3.0 provides three Replay history lengths:
30 seconds · 5 minutes · 30 minutes
The selected Keep value determines the maximum recent audio history maintained by SAR.
Longer Replay windows require more temporary disk space, especially when several synchronized tracks are active.
Save Last
Use the available Save Last buttons to create a recording from audio that has already been buffered.
Available durations include:
- Save Last 30 sec
- Save Last 5 min
- Save Last 30 min
A Save Last option becomes usable only after enough Replay history has been collected.
Clear Buffer
Clear Buffer removes the currently accumulated Replay history and starts the available Replay timeline again from zero.
Use it when you no longer need the existing buffered audio and want to begin with a fresh Replay history.
Replay Can Run Together with Normal Recording
Instant Replay and normal recording are independent workflows.
You can keep Replay active, start a normal recording, save a Replay snapshot while recording, stop the normal recording, and continue keeping Replay available afterwards.
A Replay snapshot is saved independently from the normal recording.Instant Replay and normal recording are independent workflows.
You can keep Replay active, start a normal recording, save a Replay snapshot while recording, stop the normal recording, and continue keeping Replay available afterwards.
A Replay snapshot is saved independently from the normal recording.
Replay with Multi-App, Microphone and Master Mix
Replay can preserve the synchronized source structure of an Application or Multi-App session.
Depending on the configured session, the saved Replay can include:
- separate application tracks,
- a microphone track,
- and the Master Mix.
All sources remain aligned to the same shared timeline.
Replay Is Independent from Recording Automation
Smart Recording, Auto-Split and Auto-stop do not shorten or restructure the Replay timeline.
Replay keeps recent elapsed audio history independently from those normal recording modes.
Tip: If you regularly need to capture unexpected audio, enable Replay before you begin working and choose a Keep duration that provides enough history without using unnecessary disk space.
Smart Recording, Auto-Split & Auto-stop
SAR 3.0 includes three automatic recording modes for different workflows. Smart Recording can omit unnecessary silence, Auto-Split can separate successive audio tracks, and Auto-stop can end a recording automatically after continuous silence.
Use only the automation mode that matches the current recording task.
Smart Recording
Smart Recording is useful when audio appears only intermittently and you do not want long silent sections stored in the final recording.
With a single-source workflow, SAR waits during silence and resumes writing useful audio when the signal returns.
Smart Recording does not automatically finish the entire session. Use STOP when the recording task is complete.
Auto-stop
Auto-stop ends the active recording after approximately 5 seconds of continuous silence.
This is useful when you want SAR to finish automatically after the source audio ends.
In synchronized sessions, SAR evaluates the relevant active sources before deciding that the recording is silent.
Auto-Split
Auto-Split is designed for sequential audio separated by silence.
SAR detects the end of one audio section, saves the completed segment, and can then wait for the next one.
This is useful for playlists, albums, sequential tracks, or other recordings where separate output files are preferred.
Record One Track Only
Enable “Auto-Split: record one track only” when SAR should capture one complete detected track and then return to Idle.
Without this option, Auto-Split can continue waiting for another track after the previous one has been completed.
Adjusting Silence Detection
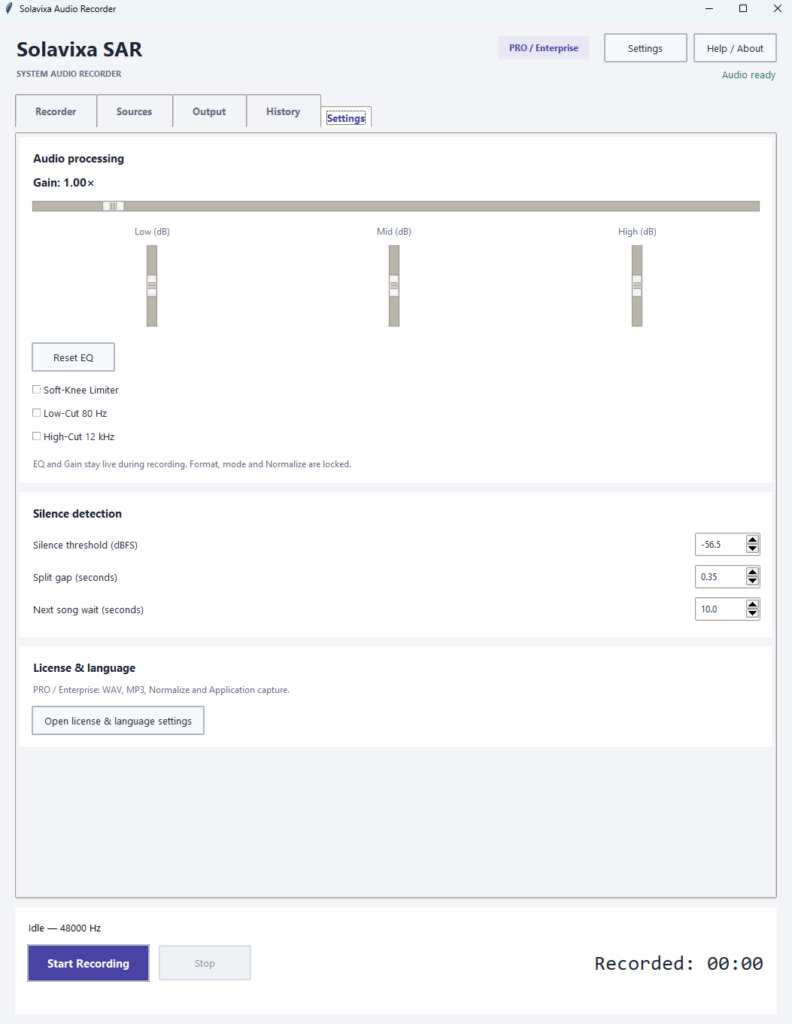
The Settings page lets you control how SAR recognizes silence and track boundaries.
Important controls include:
- Silence threshold (dBFS) — defines what SAR treats as silence.
- Split gap (seconds) — determines how long silence must continue before a split is confirmed.
- Next song wait (seconds) — determines how long SAR waits for the next track.
If tracks are split too early or too late, adjust these values gradually rather than making large changes at once.
Automation Modes Are Separate
Smart Recording, Auto-Split and Auto-stop are separate recording modes.
Selecting one mode prevents conflicting automation behavior during the same recording session.
Tip: Use Smart Recording for intermittent audio, Auto-Split for sequential tracks, and Auto-stop when you want SAR to end the recording automatically after the source becomes silent.
Output, Export & Normalize
The Output page controls where recordings are saved, which output format is used, whether Normalize is applied, and how pending recordings are recovered after an interrupted save or export.
SAR separates live capture from post-recording export so the recording path remains protected while conversion and finalization can continue afterwards.
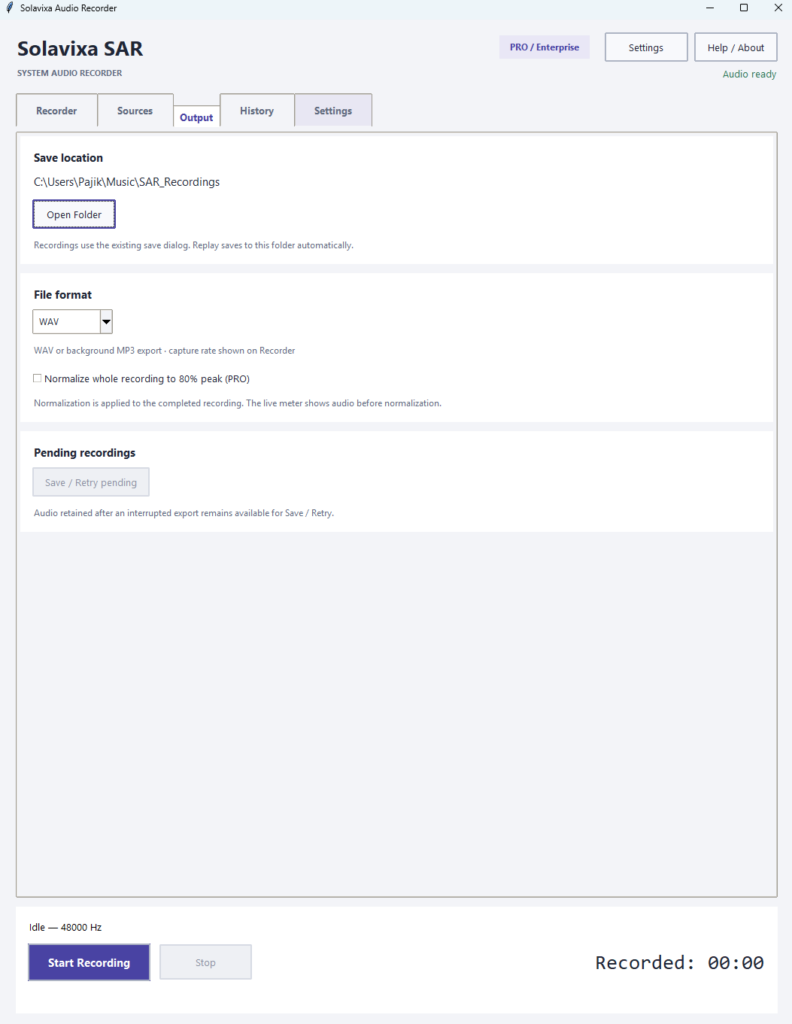
Choose the Save Location
The Save location field defines where completed recordings and Replay snapshots are stored.
Use Open Folder to open the current recording directory directly in Windows Explorer.
Choose a location with enough free space, especially when using long Replay windows or several synchronized tracks.
WAV Output
WAV stores the recording as uncompressed audio and is the safest choice when maximum editing flexibility is required.
WAV is also the available recording format in Trial mode.
Best for: editing, archiving, lossless workflows, and further processing.
MP3 Output
MP3 creates a smaller compressed audio file that is convenient for distribution, playback, and storage.
MP3 export requires a valid PRO or Enterprise license.
SAR performs MP3 conversion through its bundled export workflow after the recording has been captured safely.
Normalize
Normalize adjusts the completed recording after capture rather than changing the live input level.
SAR analyzes the finished audio and scales the output toward an 80% peak target.
This is different from Gain:
- Gain changes the signal during capture.
- Normalize adjusts the completed recording afterwards.
Normalize requires PRO or Enterprise.
Background Export
Export and conversion run separately from live audio capture.
After a recording is completed, SAR can process the final output in the background instead of blocking the capture engine unnecessarily.
This is especially useful for longer MP3 recordings.
Save / Retry Pending
If a recording was captured successfully but the final save or export was interrupted, SAR can retain it as a pending recording.
Use:
Output → Save / Retry pending
to attempt the finalization again.
This recovery workflow is designed around one priority:
protect the captured audio first, finish the export afterwards.
Do Not Delete Pending Recording Data Manually
If SAR reports a pending recording, use the built-in Save / Retry pending workflow before deleting temporary files or changing the recording folder.
This gives SAR the best chance to complete the original output correctly.
Tip: Use WAV when you plan to edit or archive the recording. Use MP3 when smaller files and easy playback are more important. Enable Normalize when you want SAR to adjust the final peak level automatically after recording.
History & Recovery Messages
The History page provides a running overview of important Recorder events, including recording activity, source changes, export results, Replay actions, and recovery-related messages.
Use History when you need to confirm what SAR did during a session or when troubleshooting an interrupted recording or export.
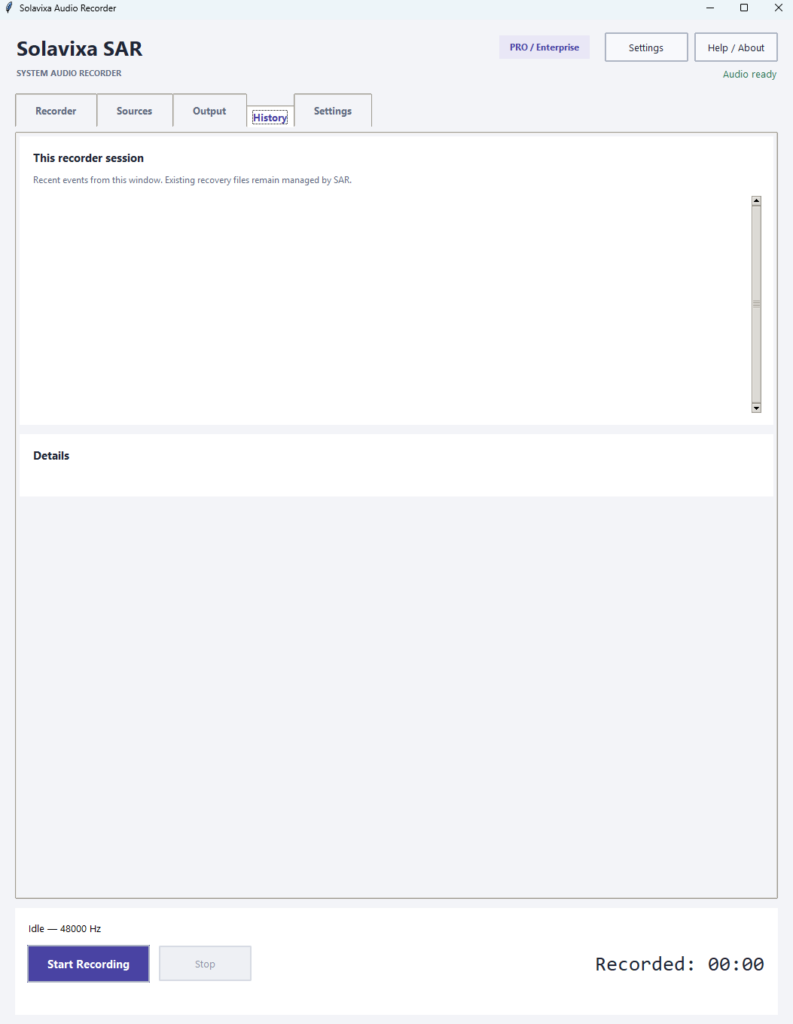
Recording Events
History records important actions that happen during the current Recorder session.
Depending on the workflow, this can include events such as:
- recording started,
- recording stopped,
- Replay snapshot saved,
- export started,
- export completed,
- source became unavailable,
- recovery or retry actions.
History therefore gives you a quick chronological view of what happened.
Source Status Messages
If a selected application or microphone becomes unavailable, SAR records the related status information so the problem can be identified later.
SAR does not silently switch to another device or application.
Reconnect the original source and use Refresh to restore the configured workflow.
Export Messages
History can help confirm whether the final export completed successfully or whether the recording remained pending.
If export did not finish, go to
Output → Save / Retry pending
and attempt the finalization again.
Replay Messages
Replay-related events help confirm when a snapshot was requested and whether it was successfully saved.
This is useful when Replay is running together with normal recording and several outputs are being created during one session.
History Is a Session Log, Not a Permanent Archive
The History page is intended as a practical session-level event log inside SAR.
It helps you understand recent Recorder activity, but it should not be treated as a permanent audit log or long-term recording database.
When Something Goes Wrong
If a recording or export does not complete as expected:
- check History for the latest event,
- verify the selected source,
- reconnect unavailable applications or devices,
- click the appropriate Refresh control,
- use Save / Retry pending if SAR reports recoverable output.
Tip: If you contact Solavixa support about a recording problem, the latest History messages can help explain what happened immediately before the issue.
Audio Processing & Signal Controls
SAR 3.0 includes live signal controls that help you adjust recording level, shape the frequency balance, reduce unwanted low or high frequencies, and control occasional peaks before the audio is written.
Use these controls conservatively. Clean source levels are always preferable to excessive gain or heavy processing.
Main Gain
Gain adjusts the level of the main recorded signal before it is written to the recording.
Increase Gain gradually if the source is too quiet.
If the signal approaches full scale or the CLIP indicator activates, reduce Gain to avoid distortion.
Gain affects capture in real time. Normalize, by contrast, is applied after recording.
Mic Gain
Mic Gain controls the microphone level independently from application audio.
Use it to balance your voice against the selected application sources.
Slider and arrow adjustments apply immediately.
If you type a Mic Gain value manually, confirm it with Enter or move focus away from the field so SAR can apply the new setting.
Three-Band EQ
SAR provides three basic EQ controls:
- Low EQ — approximately 150 Hz
- Mid EQ — approximately 1 kHz
- High EQ — approximately 6 kHz
Use them for small tonal corrections rather than aggressive reshaping.
Reset EQ returns the three bands to neutral.
Low-Cut and High-Cut
Low-Cut 80 Hz helps reduce very low-frequency rumble and handling noise.
High-Cut 12 kHz reduces higher-frequency content above the selected cutoff region.
These filters can be useful when the source contains unnecessary frequency extremes.
Soft-Knee Limiter
The Soft-Knee Limiter helps control occasional strong peaks before they become excessive.
It reduces peak level progressively rather than applying an abrupt hard ceiling.
The limiter is useful for unpredictable sources, but it should not be used to compensate for excessively high Gain or Mic Gain.
Monitoring Clipping
If the CLIP indicator activates, the signal has reached or exceeded a level that may cause audible distortion.
Recommended procedure:
- reduce Gain or Mic Gain,
- reduce excessive positive EQ,
- keep the source application’s own output at a sensible level,
- use Reset Clip,
- continue monitoring for new clipping events.
Tip: Start with neutral EQ, moderate Gain, and processing disabled unless it is actually needed. Add processing only after you have confirmed the raw source level is healthy.
Licensing & Activation
SAR 3.0 is available in Trial, PRO, and Enterprise editions. The selected license determines which advanced recording, export, Replay, and activation features are available.
Licensing is managed from the main SAR window before opening the Recorder.
Trial Mode
Trial mode lets you test the basic SAR workflow before purchasing a license.
Trial limitations include:
- WAV output only
- maximum 60 seconds per recording
- maximum 5 saved recordings
- advanced PRO / Enterprise features remain locked
The Trial is intended mainly for checking compatibility, basic recording, and the general workflow on your Windows PC.
PRO Licenses
SAR is available with two time-limited PRO options:
- PRO 1 Month
- PRO 3 Years
A valid PRO license unlocks the advanced SAR 3.0 workflow, including Application Capture, Multi-App, microphone features, Master Mix, Instant Replay, MP3 export, Normalize, and other licensed functions.
14-Day Grace Period
Both time-limited PRO licenses include an additional 14-day grace period after the paid term expires.
This means SAR does not immediately lose PRO functionality on the exact expiration date.
The grace period gives you additional time to finish ongoing work or renew the license.
Enterprise Lifetime
Enterprise Lifetime provides permanent access for the licensed device.
Enterprise includes the full SAR 3.0 feature set and does not require a grace period because the license itself does not expire.
Enterprise is also available as a Lifetime Multilicense for deployments across multiple devices.
Online and Offline Enterprise Activation
Enterprise supports both online activation and a dedicated offline token activation workflow.
Offline activation is useful when the target system cannot or should not perform the standard online activation procedure.
Hardware ID and Device Licensing
SAR uses the Hardware ID (HWID) shown in the main window to identify the licensed computer.
If you move to a replacement computer or need a device reset, the HWID and original order information may be required as part of the licensing workflow.
Seven Interface Languages
SAR 3.0 supports:
English · Czech · German · French · Italian · Spanish · Simplified Chinese
Choose the required language from the main window. If necessary, restart SAR so the selected language is applied consistently across the interface.
Tip: Activate the required PRO or Enterprise license before configuring advanced recording features, especially Multi-App, microphone workflows, Master Mix, Instant Replay, MP3, and Normalize.
Troubleshooting & Recommended Workflow
Most SAR issues can be resolved by checking the selected source, confirming that the source is producing audio, refreshing the relevant device or application list, and reviewing the current Recorder status.
The following steps cover the most common situations encountered during recording, Replay, export, and source recovery.
Source Unavailable
If SAR displays:
Source unavailable – reconnect the device/application and click Refresh
do the following:
- reconnect or restart the original device or application,
- confirm that it is available in Windows,
- click the appropriate Refresh control,
- reselect the source if required.
SAR does not automatically switch to another device or application.
This prevents the recorder from silently capturing the wrong source.
Application Not Listed
If an application does not appear in Application Capture:
- start audio playback in that application,
- click Refresh Applications,
- confirm that the application is still running,
- check whether it appears in the list.
Some packaged or multi-process Windows applications may not expose an audio session that SAR can reliably associate with one usable process.
In that case, use System Audio or another supported desktop application.
Microphone Not Available
If the required microphone is not listed:
- connect the microphone,
- confirm that Windows recognizes it,
- click Refresh microphones,
- select the required microphone again.
If the microphone becomes unavailable during a synchronized session, the remaining healthy sources can continue while the microphone track is represented by silence.
Replay Controls Are Disabled
Check that:
- a valid PRO or Enterprise license is active,
- the source is healthy and prepared,
- Replay Buffer is enabled,
- enough Replay history has accumulated,
- the selected Keep duration supports the requested Save Last duration,
- sufficient disk space is available.
For example, Save Last 5 min cannot be used until at least five minutes of Replay history exist.
Recording Is Too Quiet
Check the source application’s own playback level first.
Then, if necessary:
- increase Gain gradually,
- increase Mic Gain for the microphone,
- monitor the signal level,
- avoid extreme values.
The best result usually comes from a healthy source level with only moderate gain correction inside SAR.
Recording Is Distorted or Clipping
Reduce:
- Gain
- Mic Gain
- excessive positive EQ boosts
The Soft-Knee Limiter can help with occasional peaks, but it should not be used to compensate for permanently excessive levels.
After adjustment, use Reset Clip and continue monitoring the signal.
Pending Recording or Interrupted Export
If SAR reports recoverable output:
- open Output,
- use Save / Retry pending,
- allow SAR to complete the finalization,
- check the output folder afterwards.
Avoid deleting temporary or pending recording data manually before trying the built-in recovery workflow.
Recommended SAR Workflow
For most sessions:
- Choose the source on the Sources page.
- Configure Multi-App, microphone, and Master Mix if required.
- Select WAV or MP3 and confirm the save location.
- Adjust Gain and processing only if necessary.
- Enable Instant Replay if you want recent audio available before recording.
- Choose Smart Recording, Auto-Split, Auto-stop, or manual recording
- Press START.
- Monitor the source and CLIP status.
- Press STOP when finished.
- Check History and Output if export or recovery needs attention.
ℹ Legal and Technical Note
SAR includes components based on FFmpeg under its applicable license terms. Support for optional external tools is user-provided. The application itself is designed as a workflow and processing environment.
For more information about FFmpeg, visit the official FFmpeg website.
Ready to Use SAR 3.0?
Download the trial, compare license options, read the complete PDF User Guide, or visit the SAR FAQ for additional answers and troubleshooting information.