
Media Workflow Tool — User Guide
Learn how to use MWT step by step, understand the main interface, and work with greater clarity, speed, and control.
Quick Start · Main Window · Buttons · Workflow · Tips · Troubleshooting
✓ Quick Start
New to MWT? Follow these basic steps to get started quickly.
- Open MWT and review the main interface.
- Select your input or prepare the task you want to process.
- Check the available workflow options and settings.
- Start the task and monitor progress in the application.
- Review the output, logs, or saved results after completion.
This quick start section is intended to help first-time users begin with confidence.
🖥 Main Window Overview
The MWT interface is designed to keep media workflows clear, practical, and easy to control.
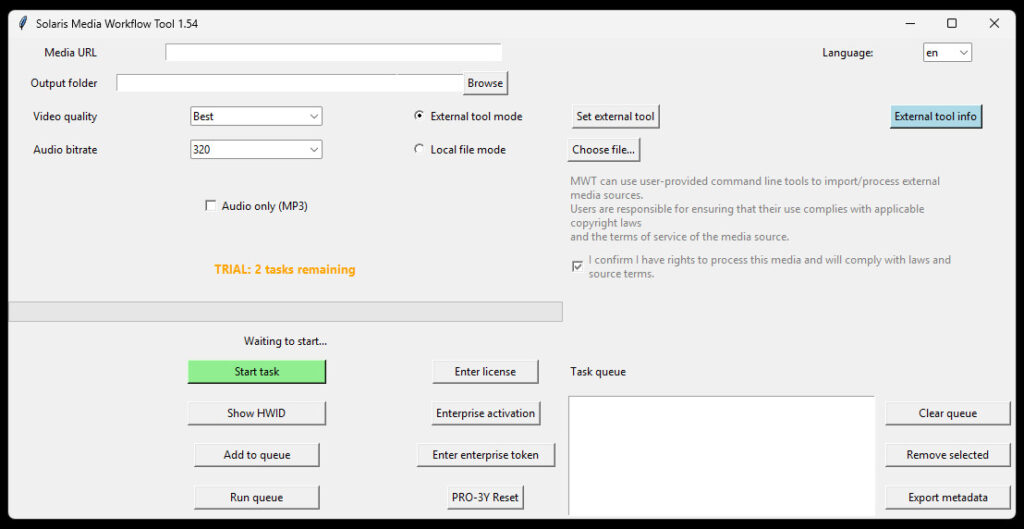
1. Top section
Contains the main controls, settings, or workflow entry points used to start and manage tasks.
2. Central workspace
Displays the main working area where task setup, media handling, or workflow interaction takes place.
3. Status and progress area
Shows current task activity, progress details, and important runtime feedback.
4. Output or log area
Helps you review results, messages, and completed actions more easily.
⚙ Buttons and Their Functions
Below is a practical overview of the main controls used in MWT.
1. Input and source fields
Media URL
Use the Media URL field to enter the source reference for an external media task. This field is used when External tool mode is selected. Paste the media link or source reference you want to process. If this field is left empty in external mode, the task cannot start and the application shows an error asking for a source reference.
What it does:
The value entered here becomes the task source (src) when the application builds a task in external mode.
Output folder
Use the Output folder field to define where processed files will be saved. This field is required for every task, regardless of whether you use external mode or local file mode. Before a task starts, MWT checks whether the folder is filled in and whether the selected path really exists. If the folder is missing or invalid, the task is blocked and an error message is shown.
What it does:
The selected path is stored as output_folder in the task configuration and is used as the destination for the processed output.
Browse
Click Browse to choose the output folder from a folder picker instead of typing the path manually. After selecting a folder, MWT automatically inserts the chosen path into the Output folder field. This is the safest way to set the destination correctly and avoid path mistakes.
Choose File…
Click Choose file… to select a local media file from your computer. This button is used together with Local file mode. Supported file types include video and audio formats such as MP4, MKV, WEBM, MOV, MP3, WAV, FLAC, M4A, and AAC. After you choose a file, its path is inserted into the local file field automatically.
External tool mode
Select External tool mode when you want MWT to process an external media source using a user-provided external command-line tool. In this mode, you must set the external tool path, confirm the legal rights checkbox, and provide a valid media source reference in the Media URL field. If any of these requirements is missing, the task will not start.
What it does:
This mode sets the task mode to external and makes MWT read the source from the URL/source reference field.
Local file mode
Select Local file mode when you want to process a media file that is already stored on your computer. In this mode, MWT ignores the Media URL field and instead uses the local file selected with Choose file…. If no valid local file is selected, the task is blocked and an error is shown.
What it does:
This mode sets the task mode to local and makes MWT use the selected file path as the task source.
I confirm I have rights…
Enable I confirm I have rights… to confirm that you have the legal right to process the selected external media and that you will comply with applicable laws and source terms. This checkbox is required for external mode. If it is not enabled, MWT blocks the task and shows an error instead of starting processing. Once enabled, the value is stored in the configuration for later use.
2. Processing options
Video quality
Use Video quality to select the preferred output quality for video-based tasks. Available options are Best, 2160p, 1440p, 1080p, 720p, 480p, 360p, and 240p. The default value is Best. Choose a specific resolution only when you want to limit the output to that level; otherwise keep Best for the highest available quality allowed by the source and workflow.
What it does:
The selected value is passed into the task as video_quality.
Audio bitrate
Use Audio bitrate to choose the target bitrate for audio processing. Available values are 128, 192, 256, and 320, with 320 selected by default. Higher values generally aim for better audio quality but may increase file size. This setting is especially relevant when working with audio output.
What it does:
The selected value is stored in the task as audio_bitrate.
Audio only (MP3)
Enable Audio only (MP3) when you want to save audio output instead of a full video result. This option is useful when you only need the audio track. When a task finishes successfully and the output file is an MP3, MWT shows a confirmation message specifically stating that audio was saved.
What it does:
This checkbox sets the audio_only flag in the task configuration.
Start task
Click Start task to run the current task immediately using the settings currently visible in the form. Before the task starts, MWT validates the selected mode, source, output folder, and other required conditions. During processing, the progress bar and status text are updated. After a successful run, the output is saved, history is written, and a completion message is shown. If the trial cannot be consumed after completion, the created output file is removed.
Important note:
The Start button can also be disabled when the application is blocked by trial/licensing state.
External tool info
Click External tool info to open information about the configured external tool. This is useful when working in external mode and needing more detail about the tool or supported source handling. The button uses the currently configured external tool path and first checks that the tool is properly configured.
Set external tool
Click Set external tool to define the path to the external command-line tool used in external mode. Use this button when you want MWT to work with external media sources. Once a valid tool path is selected, the application stores it in the configuration for later use. If external mode is selected and no valid tool is configured, tasks cannot start.
3. Queue and export tools
Task queue
The Task queue window displays prepared tasks waiting to be processed. It allows you to build a batch of tasks, review queued items, remove selected entries, clear the full list, and then run the queue as a group. In the current UI, the queue is implemented as a listbox connected to a dedicated queue controller.
Add to queue
Click Add to queue to save the currently prepared task into the task queue instead of running it immediately. This is useful when you want to prepare multiple tasks first and process them later in a controlled batch. In the current application structure, the queue is wired as a Pro-oriented feature.
What it does:
This button sends the current UI configuration to the queue controller through add_current_task().
Run queue
Click Run queue to process all queued tasks in sequence. Use this when you have prepared multiple items and want MWT to execute them one after another. This feature is connected to the queue controller and is intended for queued batch workflow operation.
What it does:
This triggers the queue controller through run_queue().
Remove selected
Click Remove selected to delete only the highlighted task or tasks from the queue. This is useful when you want to keep the queue but remove one or more items before running it. The queue list also supports the Delete key for the same removal action.
Clear queue
Click Clear queue to remove all queued items from the task queue at once. Use this when you want to discard the prepared batch and start building a new one.
Export metadata
Click Export metadata to export task history metadata to JSON or CSV. This feature requires Pro access. If there is no history available, MWT informs you that there is nothing to export. If history exists, the application opens a save dialog and writes the exported metadata to the selected file.
4. Licensing and application controls
Enter license
Click Enter license to activate a standard term license in the application. This opens the license activation dialog and, after successful activation, refreshes the stored configuration and displayed license status. In the current code, this button is implemented as Enter code.
Enterprise activation
Click Enterprise activation to open the online enterprise activation dialog. Use this option when you want to activate an enterprise license through the enterprise activation flow. After a successful activation, the application refreshes the stored configuration and updates the current status display.
Enter enterprise token
Click Enter enterprise token to activate MWT using an offline enterprise token. This is intended for enterprise scenarios where a token-based activation flow is used instead of the regular term-license activation. In the current code, the button text is Enterprise token.
PRO-3Y Reset
Click PRO-3Y Reset to start the self-reset flow for a Pro 3 Years license. This option is used when the license needs to be reset according to the supported reset policy. After the reset flow completes, MWT refreshes the stored configuration and the on-screen license status.
Show HWID
Click Show HWID to open a dialog displaying the device HWID currently used for licensing and binding. This is useful when activating licenses, troubleshooting device binding issues, or communicating with support.
Language
Use Language to switch the application interface language. Available options are cs, en, de, fr, it, es. When you select a new language, MWT saves the choice into the configuration and shows a restart message, so the application should be restarted to fully apply the change.
→ How to Use MWT Step by Step
Follow the steps below to prepare, run, and manage tasks in MWT correctly.
Step 1 — Choose your working mode
First decide how you want to process media.
Select External tool mode if you want to process an external media source using a user-provided external command-line tool.
Select Local file mode if you want to process a media file that is already stored on your computer.
Use only one mode for the task you are currently preparing. In external mode, MWT expects a source reference. In local file mode, MWT expects a valid local file path.
Step 2 — Enter the source
Provide the media source required for the selected mode.
If you are using external mode, enter the source in the Media URL field.
If you are using local file mode, click Choose file… and select the media file from your computer.
Make sure the correct source is filled in before continuing. If the source is missing, the task cannot start.
Step 3 — Select the output folder
Choose where the processed result should be saved.
Enter the destination into Output folder, or click Browse to select the folder more safely from the folder picker.
The selected folder must already exist. If the output folder is empty or invalid, MWT blocks the task and shows an error message.
Step 4 — Adjust processing settings
Set the output options for the current task.
Choose the desired value in Video quality.
Choose the desired value in Audio bitrate.
Enable Audio only (MP3) if you want audio output instead of full video output.
These settings define how the task will be prepared before processing begins.
Step 5 — Prepare external tool usage if needed
Complete the additional requirements for external mode.
If you are using External tool mode, click Set external tool and select the correct external tool path if it has not already been configured.
Then enable I confirm I have rights… to confirm that you have the legal right to process the selected media and that you will comply with applicable laws and source terms.
Without a configured external tool and without this confirmation, an external task cannot start.
Step 6 — Start one task or build a queue
Decide whether you want to run the current task immediately or prepare multiple tasks first.
Click Start task if you want to process the current task immediately.
Click Add to queue if you want to save the current task into the Task queue and continue preparing more tasks.
Use Run queue when the queue is ready and you want MWT to process all queued tasks in sequence.
Step 7 — Monitor progress
Watch the task status while processing is running.
During execution, MWT updates the progress bar and the status text. This helps you see whether the task is preparing, processing, merging, encoding, or finished.
If an error occurs, MWT displays an error message instead of the completion message.
Step 8 — Review the result
Check the saved result after the task finishes successfully.
When the task finishes, MWT shows a completion message. If the output is MP3, the application specifically confirms that audio was saved. For other successful tasks, MWT reports the completed result path.
At this stage, check the saved file in the selected output folder and confirm that the result matches your expectations.
Step 9 — Manage queued items when needed
Edit the queue before running it if necessary.
Use Remove selected to delete only chosen tasks from the queue.
Use Clear queue to remove the full queued list and start over.
This helps keep batch processing clean and controlled. The queue also supports removing selected items with the Delete key.
Step 10 — Export metadata and review history
Export task history when you need structured output records.
Click Export metadata to export available history as JSON or CSV. This feature requires Pro access.
Use it when you need a structured record of completed tasks, outputs, or workflow history. If no history exists yet, the application informs you that there is nothing to export.
Step 11 — Manage license and activation
Use the licensing controls when you need to activate or manage access.
Click Enter license to activate a standard term license.
Click Enterprise activation for online enterprise activation.
Click Enter enterprise token for offline enterprise activation.
Click PRO-3Y Reset when you need to use the supported self-reset flow for a Pro 3 Years license.
Click Show HWID if you need to check the device hardware ID used for binding and activation.
Step 12 — Change the language if needed
Use the Language selector to change the application language.
Choose one of the available languages in the Language field. After changing it, MWT saves the selection and asks for restart so the interface can reload correctly in the new language.
🗂 Output, History, and Logs
MWT helps users keep better visibility over task results and completed workflow activity.
✓ Output review
Check where completed files, exports, or generated results are stored.
✓ Task history
Review previously completed actions to keep workflows organized.
✓ Runtime messages
Use logs or status messages to better understand what happened during processing.
✓ Better traceability
Structured output and history improve consistency and workflow clarity.
💡 Tips for Efficient Use
Use these simple recommendations to work with MWT more effectively.
✓ Keep your workflow consistent
Use the same setup approach for similar recurring tasks.
✓ Review settings before running tasks
A quick check can help prevent avoidable mistakes.
✓ Monitor logs when needed
Logs can help you understand task behavior and completed actions.
✓ Organize your output clearly
A structured output workflow saves time later.
✓ Start simple
Use the most basic workflow first, then expand as needed.
⚠ Troubleshooting
If something does not work as expected, use the checks below before retrying.
Q1
The task does not start
Make sure your input, settings, and required workflow elements are selected correctly.
Q2
The output was not created
Check whether the task completed successfully and review any messages shown in the interface.
Q3
An external tool is not available
If your workflow depends on an optional user-provided external tool, confirm that it is installed and configured correctly.
Q4
The workflow stopped unexpectedly
Review the current task settings and check logs or messages for more detail.
Q5
The result is not what I expected
Repeat the task with simpler settings and confirm that the selected workflow matches your goal.
ℹ Legal and Technical Note
MWT includes components based on FFmpeg under its applicable license terms. Support for optional external tools is user-provided. The application itself is designed as a workflow and processing environment.
Need help getting started?
Explore MWT, review the workflow step by step, and choose the licensing option that fits your use case.